Efficient, low impact running technique can make you a better, healthier runner. For any other sport, you would get lessons to learn how to protect your body and be more effective, and running shouldn’t be any different. Unfortunately, running has a high injury rate for a non-contact sport, and I believe the main reason is that people aren’t taught how to do it properly.
I’ve spent a lifetime studying running form. I started receiving technique training at age 8 from Dr. Tom Miller, author of the running technique book “Programmed to Run.” Most of this is because my father Hawk Harper ran his whole career with no cartilage in his knee and had to learn to run in a way to protect his body or he didn’t run at all. He started running a several years after completely destroying his knee playing collegiate football. The doctors told him he would never run again, and never even walk normal again. The latter part has been true. As a 240 pound weightlifter, a friend sent him a postcard that said “Hawk, if you’re really tough, you’ll do this.” The postcard was for the Las Vegas Marathon. My dad finished the race, but was practically the last finisher, and was in excruciating pain. Eventually he saw some Kenyan runners and thought “those guys float…I’ll bet if I ran like them my knee wouldn’t hurt.” Seven years later and 110 pounds lighter at age 37, my dad won the St. George Marathon, running 2:22. He mastered Kenyan-style, efficient, low impact running technique to keep his knee and body in good shape along the way. He’s nearly 80 today and still running & trail running regularly.
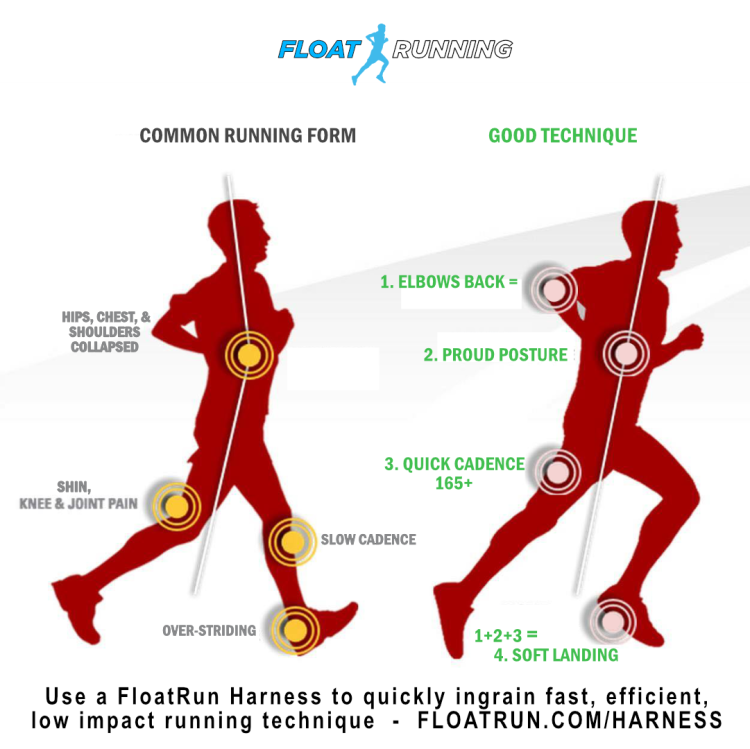
Below are 4 points to efficient, low impact running technique that my dad first learned while studying the Kenyans, and that I’ve furthered by studying elites and injury free runners in college and ever since.
Over the years, while teaching hundreds of these classes, the information has continually morphed to not necessarily give you the most technically accurate direction, but rather to give cues that quickly provide the best results to a wide variety of runners.
This video gives a quick overview with more detail written below:
Float Running Step 1: Compact, “Elbows Back” Arms
Arm swing is #1 for a reason! They control almost everything. If you get your arms right, your posture, cadence, and foot strike will all fall in line. This is why the FloatRun Harness was developed as the simplest way to get efficient, low impact running form.
The biggest form problem we see with most runners is that they swing their arms too much, especially forward. This often causes injurious over-striding, asymmetry problems, slow cadence, and poor posture. Meanwhile, elite runners have very compact arm movement when running. Most keep their hands quite high, with their wrists brushing up against their ribs, quickly popping their elbows back and letting them passively recover while the other elbow is popping back. They also keep their arms from coming over across their body.
To increase efficiency, keep your arms compact and close to your chest at—most runners carry their arms far too low. On the other hand, elite runners average arm angles between 55 (female) and 70 degrees (male) on average. Unless you are sprinting, don’t allow your elbows to come forward past your hips or your fists to cross the midline of your chest. To be as efficient as possible, move your arms as little as necessary for the speed you’re going. For reference, the average runner moving at 10 minutes/mile pace should only have about 3″ or arm movement.
Think “Chicken Wings” or “Wrists to Ribs”:
– Short, compact, relaxed arm movement
– Pump back and recover forward
– Elbows should not extend in front of the waist unless sprinting
Quick Tip: Use a FloatRun Harness, Hand weights like EggWeights Running Pods (highly recommend!) or strap on water bottles on easy runs to easily find your most efficient arm movement and angle.
Float Running Step 2: Proud Posture
“Run proud, run tall!”
Most of us spend our workday in what I like to call “keyboard position.” Unfortunately, most runners end up running in keyboard position. The trick to successful posture is getting out of keyboard position. The easiest way to do this is to focus on keeping your elbows back, and not letting them come forward past your hips.
Additionally, Straighten your back and push your chest and hips forward. This allows your momentum to help ease you into your next step. Keep your shoulders back and relaxed and keep the back straight, never bending at the waist. Gaze straight ahead and avoid looking down at your feet or raising your chin.
Chant “Run Proud, Run Tall” to yourself to get your posture right with hips and chest forward.
Quick Tip: “Pop” the moon! To reset your posture, quickly pop your arms and hands outward and upward at a 45-degree angle as if trying to pop the moon, and retract them just as quickly. This pops your hips and chest forward into “run proud” position and keeps your back straight and your core engaged.
Float Running Step 3: High Cadence 165+
I analyzed elite & rarely injured runners running at normal human speeds and found that cadence varies with pace. The old recommendation of 180+ is inefficient & difficult at slower speeds and is only applicable for most runners at speeds of faster than 7 minute per mile pace. While these great runners that were analyzed did not run at 180+ at slower speeds, they rarely if ever dropped below 165 steps/minute. Research has shown that the average runner can reduce all forces on their joints by 20% by simply increasing their cadence by 10 steps per minute. Below is what I found and recommend for cadence based on your pace.
- 165+ steps/minute: 10 min/mile and slower
- 170+: steps/minute: 9 min/mile pace
- 175+: 8 min/mile pace
- 180+: 7 min/mile pace and faster
I recommend downloading a free metronome app to your phone (I use Pro Metronome) and running to the corresponding beat.
You can also use a watch and do a “cadence check” by counting how many times your right leg hits the ground in 20 seconds. Shoot for 28 (which is 162 steps/min) to 30 (180 steps per minute).
If all else fails, grab the metronome off of a piano, set it to the right tempo, take it for a spin and run to the beat 😉
Float Running Step 4: Bent Knee Landing
A proper, low-impact foot strike is the result of proud posture, compact arms, and quick steps. Thinking about your foot strike can cause lower leg fatigue, cramps, or other problems, and should be avoided. Each runner has their own unique foot strike, molded by genetics, running surface, and speed of running.
Most runners should land somewhere close to midfoot with their foot parallel to the ground. A slight heel landing or slight forefoot strike works great as long as the foot hits the ground underneath your body. Over-striding, excessive heel striking and running on your toes should be avoided as they cause excessive stress and impact.
– Quick tip: Say to yourself “run a little quieter” or “bend the knees a little”
– Avoid overstriding & excessive heel striking
– Keep the knees bent & feet relaxed
The FloatRun Harness, the easiest and most effective way to hard-wire in the principles discussed above.
Keep in mind that using a FloatRun Harness and having compact arms will automatically quicken your cadence, as will shoes without an elevated heel and/or less cushioned shoes. Highly cushioned shoes and shoes with elevated heels have both been shown in research to make cadence significantly worse.
To bring it all together, just chant to yourself “Run proud, run tall, elbows back, relax!”
RUNNING TECHNIQUE CAN REDUCE INJURY & IMPROVE PERFORMANCE
